

Before we grab our tools, let’s be clear about why knowing your exact number in Grains Per Gallon (GPG) is non-negotiable. It’s the single most important piece of data for making a smart financial decision. A “maybe” can cost you dearly:
Under-sizing Your Solution
You guess you have “hard” water (maybe 8 GPG) but in reality, it’s “very hard” (15 GPG). You buy a standard-capacity softener. It can’t keep up. It works constantly, wastes salt and water on frequent regenerations, and still lets hardness minerals slip through to damage your appliances. You’ve spent money only to solve half the problem.
Over-sizing Your Solution
You fear the worst and buy a massive, high-capacity unit for what turns out to be moderately hard water (5 GPG). You’ve now overspent on the initial purchase and will continue to overspend on salt and water, as the system may not operate as efficiently as a correctly sized one. It’s like buying a V8 engine for a trip to the grocery store.
Your Arsenal: 3 Methods for How to Test for Water Hardness
I’ve laid out the three main methods for testing your water. Think of them as Good, Better, and Best. Let’s find the right one for you.
Path 1: The 5-Minute Soap Test
This is your instant red flag indicator. It won’t give you a number, but it will scream “Yes, you have a problem.”
Path 2: The DIY Detective (Home Kits)
This is the sweet spot and my recommendation for most homeowners. It delivers a real number, giving you the data you need.
Path 3: The Gold Standard (Lab Test)
This is for when you suspect bigger issues than just hardness—like iron, sulfur, or other contaminants.
Path 1: The 5-Minute Soap Test
You will need: A clear, clean bottle with a tight-fitting cap (a 12-16 oz water bottle is perfect) and pure liquid soap (like basic Castile soap, not a “moisturizing” body wash).
- Fill the bottle about one-third full with tap water.
- Add 10 drops of the liquid soap, and screw the cap on tightly.
- Shake the bottle vigorously for 15 seconds.
- Observe the results.
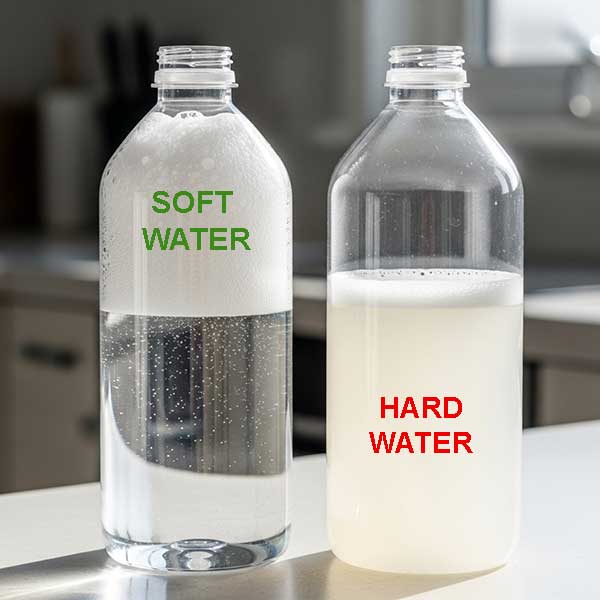
Soft Water Result: You’ll see a healthy mountain of fluffy suds, and the water underneath will be relatively clear.
Hard Water Result: You’ll see very few suds, if any. Instead, you’ll have a cloudy, milky, or scummy-looking water. If this is you, it’s time for Path 2.
Path 2: DIY Home Test Kits
This is where you get your number. There are two main types of kits:
Test Strips
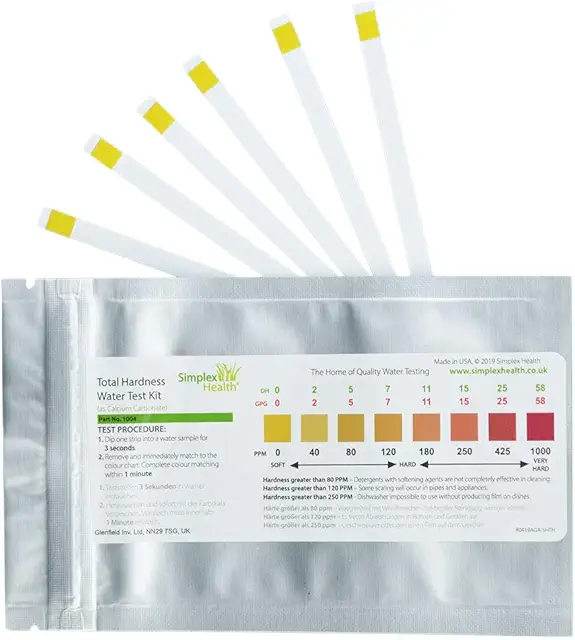
These are simple strips you dip in a water sample. The colored pads on the strip change color, and you match them to a chart on the packaging. Pros: Cheap and incredibly fast. Cons: Often inaccurate. Interpreting the subtle shades of color can be difficult, giving you a range (e.g., “between 120-180 PPM”) rather than a solid number. They’re a blunt instrument.
Titration (Drop) Kits
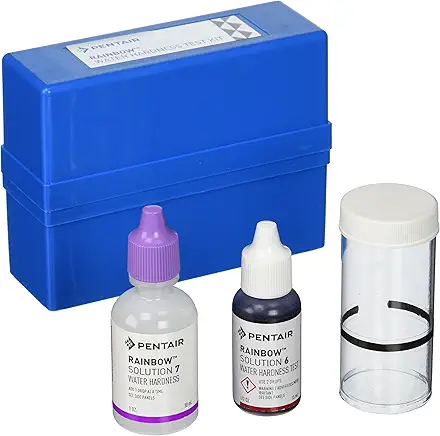
This is the method I recommend. You fill a vial with a specific amount of water, add a reagent to turn it a certain color (usually red), and then add a second reagent drop by drop, counting each drop until the color changes (usually to blue). Each drop equals 1 GPG. Pros: Far more accurate and gives you a definitive number. Cons: Slightly more expensive and takes a few more minutes.
My experience: The first time I did this, I counted 17 drops. Seventeen. That was my moment of truth. I finally knew my enemy. It was a powerful feeling.
Path 3: Professional Lab Analysis
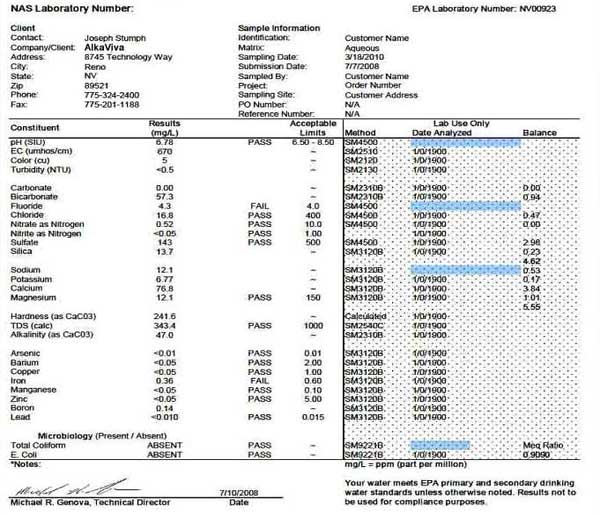
You need this path if you suspect problems beyond hardness. Are you seeing reddish-brown stains on fixtures (a sign of iron)? Does your water smell like rotten eggs (sulfur)? Is the taste metallic? A lab test gives you the full picture.
You can find a state-certified water testing lab through the Water Quality Association (WQA) or your local health department. They’ll send you a kit with instructions for collecting a sample, which you then mail back. The report you get will detail not just hardness, but pH, iron, manganese, TDS, and more. It’s the ultimate diagnostic tool for complex water issues.
