
The Ultimate Water Softener Maintenance Checklist (Monthly, Quarterly & Yearly)

When I first installed my water softener, I admit, I looked at it like a complex, mysterious machine. I was worried I’d break something or forget a crucial step. But over the years, I’ve realized it’s one of the most reliable and low-maintenance appliances in my entire home. But over the years, I’ve realized it’s one of the most reliable appliances in my home. This simple water softener maintenance checklist takes less than an hour a year to complete, and today, I’m sharing it with you.

Why Bother With Maintenance? The “Set It and Forget It” Myth

There’s a tempting myth that a water softener is a “set it and forget it” appliance. While modern systems are incredibly automated, completely ignoring them is the fastest way to a costly repair bill and a slow return to the horrors of hard water. Think of it like your car: you don’t need to be a mechanic, but you do need to check the oil and fill the gas tank. Simple, proactive water softener maintenance is what turns a 10-year appliance into a 20-year investment.

Expert Takeaway: 90% of all water softener maintenance is simply adding the right salt on time. The other 10% are simple checks that take less than 15 minutes per year and prevent 95% of common problems before they start.

This guide breaks down every task by frequency, so you know exactly what to do and when to do it.

Your Simple Water Softener Maintenance Schedule

Here is the complete checklist. We’ll dive into the “how-to” for the more complex tasks further down.

Every Month (The 5-Minute Check)


  • Check Salt Level: Lift the lid of the brine tank. The salt level should always be at least half-full. If it’s getting low, top it up, making sure you use the right kind of salt for your system.
  • Check for Salt Bridges: Gently poke the top layer of salt with a broom handle. If the salt is hard and crusty on top with a hollow space underneath, you have a salt bridge.

Every 3-4 Months (The 10-Minute Inspection)


  • Check Control Valve Settings: Glance at the digital display. Does the time look correct? Power outages can sometimes reset the clock, which can throw off regeneration timing.
  • Observe a Regeneration Cycle: Manually trigger a regeneration cycle (check your user manual for the button). Listen for the sounds of the motor and water flowing. This confirms the valve is working.

Once a Year (The 30-Minute “Deep Clean”)


  • Clean the Brine Tank: Empty the tank of all salt and water and scrub out any sediment or “salt sludge” that has accumulated at the bottom.
  • Use a Resin Cleaner: Pour the recommended amount of water softener resin cleaner into the brine tank (or directly into the resin tank, per manufacturer instructions) and run a regeneration cycle. This cleans the resin beads and keeps them efficient, especially if you have iron in your water.

Deep Dive: How to Perform Key Maintenance Tasks

Let’s walk through the two most important hands-on tasks in our water softener maintenance checklist.


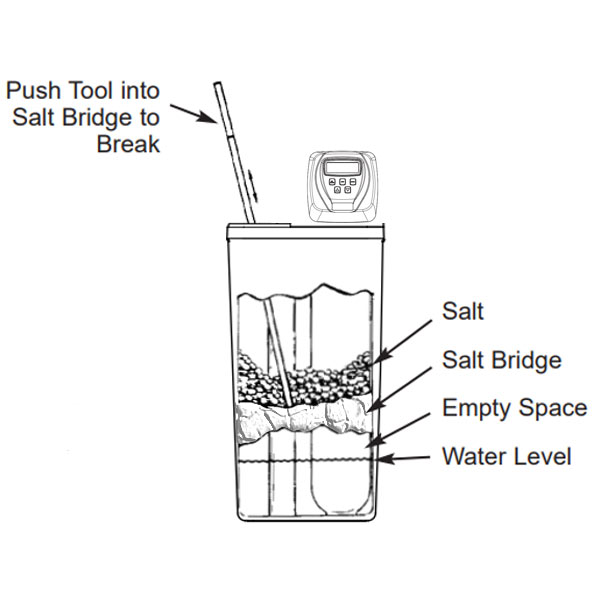
How to Break a Salt Bridge Safely

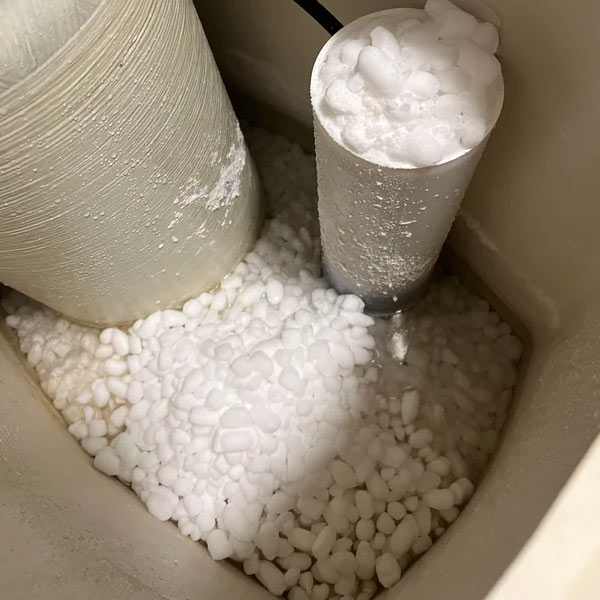
A “salt bridge” is a hard crust of salt that forms in the brine tank, preventing the loose salt on top from falling down into the water to make the brine solution needed for regeneration. It’s a very common issue.

Step-by-Step Instructions

  1. Get Your Tool: A simple broom handle or a piece of PVC pipe is perfect. Avoid using anything sharp, like a shovel, which could puncture the plastic tank.
  2. Turn Off the Bypass Valve: While not strictly necessary for this task, it’s good practice to put your softener in bypass mode before performing any maintenance.
  3. Gently Tap the Top: Start by gently tapping the top of the salt crust with the end of the broom handle. Usually, the center is the weakest point.
  4. Push Down Firmly: Once you find a weak spot, apply steady, firm pressure downwards. The goal is to break the crust into a few large pieces. You should hear a satisfying “crunch” as the bridge collapses.
  5. Break Up the Pieces: Use the handle to break up the remaining large chunks until all the salt is loose again.
  6. Turn the Bypass Valve Back On: Don’t forget this step!
A diagram and photo showing how to safely break a water softener salt bridge with a broom handle.

How to Clean Your Brine (Salt) Tank: A Step-by-Step Guide

This is the most involved part of water softener maintenance, but you only need to do it once a year. This process removes dirt, sediment, and salt buildup (“mush”) that can clog your system.

An essential yearly task in the water softener maintenance checklist: cleaning the brine tank.

Step-by-Step Instructions

  1. Put the System in Bypass: This is mandatory. You need to stop water from entering or leaving the softener.
  2. Remove Remaining Salt: Scoop out as much of the old salt as you can into a bucket. If the salt is clean, you can save it to put back in later.
  3. Empty the Water: Disconnect the brine tank from the control valve (usually with a simple quick-connect fitting). Carefully dump the remaining water outside. It’s just salty water.
  4. Scrub the Tank: Use a brush with a long handle and a mixture of soap and water to scrub the inside of the tank. Pay special attention to the bottom where sediment collects. Rinse it thoroughly with clean water.
  5. Reconnect and Refill: Reconnect the brine tank to the control valve. Add a couple of gallons of fresh water to the bottom, then pour in one or two new bags of salt.
  6. Take the System Out of Bypass: Turn the bypass valve back to the “service” position. Manually trigger a regeneration cycle to get the system primed and ready to go.

Troubleshooting: 3 Telltale Signs Your Softener Needs Attention

Even with perfect maintenance, issues can arise. If you notice any of these signs, it’s time to investigate further.

1. The Return of Hard Water

If your soap stops lathering and you see new hard water spots, it’s the clearest sign something is wrong. The first thing to check? Your salt level and for a potential salt bridge.

2. Regeneration Problems

Is the system regenerating constantly, or not at all? This often points to an issue with the control valve’s meter or timer. A power outage can also cause this if the clock is reset.

3. Change in Water Pressure

A sudden drop in water pressure throughout your house could indicate a serious problem, like a clog in the system or a resin bed failure. You should put the system in bypass and call a professional immediately.

Read my complete troubleshooting guide for solutions »

Your Key to a Long-Lasting System

As you can see, water softener maintenance isn’t complicated. It’s a series of simple, predictable checks. By following this checklist, you’re not just performing tasks; you’re actively protecting your investment and ensuring your family has perfectly soft water for years to come. You are in complete control.

You know how to care for your system. But even with the best care, sometimes things go wrong. Knowing how to diagnose and fix the most common issues is the final piece of the puzzle to becoming a true master of your home’s water.

Index